Fix GOM Player distorted sound
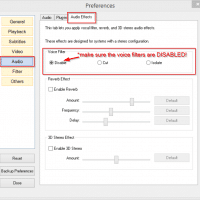
If your GOM Player has very distorted/scratchy/popping noise during video playback, then here is a setting you will want to check: Preferences -> Audio -> Audio Effects tab -> Voice Filter -> Disable Setting the audio effects voice filter to ‘None’ resolved the sound issue for me. Previously the ‘cut’ filter had been checked and it was causing some terrible sound issues on certain videos, I am not sure how the checkbox ever got check but it could have been