How to check WiFi speeds in Windows 10 [Solved]
Question. How can I check wifi speeds in Windows 10 Pro?
Answer. Here are two methods to check Windows 10 wifi connection speeds:
#1 Graphical User Interface (GUI) method
- Press Windows Key + R and type ncpa.cpl
- Press Enter
- Double-click the WiFi adapter that you want to check
- The Wi-Fi Status window will display:

Windows 10 Graphical Display of WiFi Speeds (like the Windows 7 interface)
#2 Command Prompt text method
- Open a Command Prompt (or Press Windows Key + R and type cmd)
- Type netsh wlan show interfaces and press Enter
- You will get a text listing of Wi-Fi info and speeds (See below)
Both methods will show your current WiFi speeds in Mbps. 🙂
I hope this helps!
Example command prompt text output:
C:\Users\User>netsh wlan show interfaces

There is 1 interface on the system:

Name : Wi-Fi
Description : Intel(R) Dual Band Wireless-AC 8265
GUID : 90207d8b-3d19-4d09-9f3f-0dcde421XXXX
Physical address : 3c:6a:a7:XX:XX:XX
State : connected
SSID : EERO
BSSID : f8:bb:bf:XX:XX:XX
Network type : Infrastructure
Radio type : 802.11ac
Authentication : WPA2-Personal
Cipher : CCMP
Connection mode : Profile
Channel : 36
Receive rate (Mbps) : 260
Transmit rate (Mbps) : 260
Signal : 48%
Profile : EERO
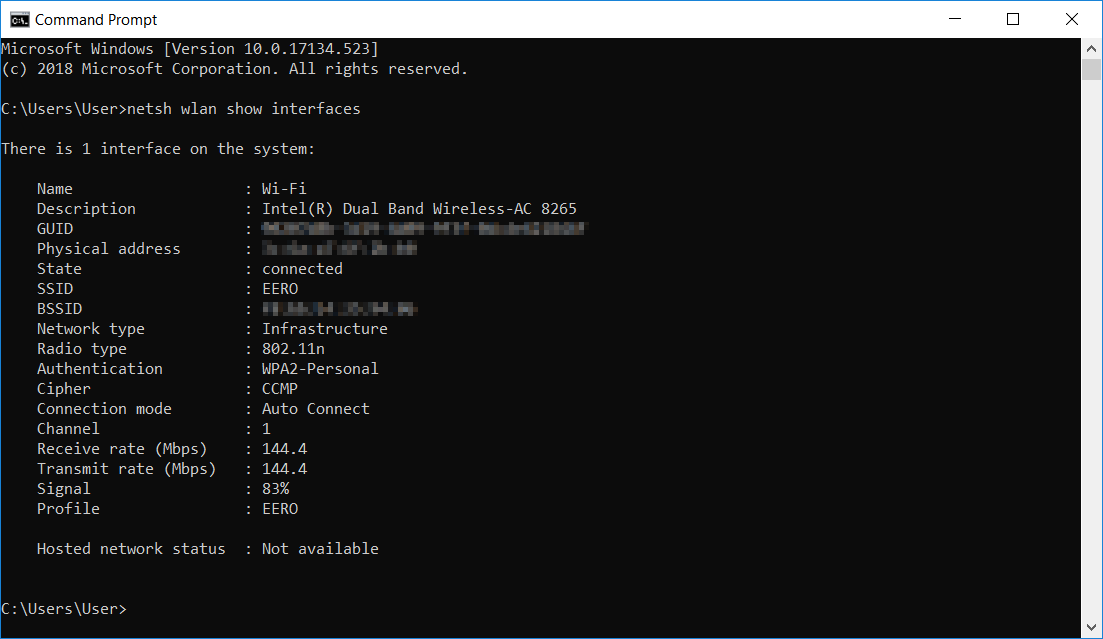
Windows 10 Command Prompt Display of Wireless Network Speeds
Top Search Terms:
- check wifi speed windows 10 (5)
- how to check wifi speed windows 10 (3)
- wifi speed test windows 10 (2)
- windows 10 check wifi speed (2)
- how to check wifi speed in windows 10 (1)
- find my wifi speed windows 10 (1)
- checking wi-fi speed on windows 10 (1)
- check wifi speed windows 10 bing link (1)
- windows show wlan speed cli (1)
- check speed on wifi windows 10 (1)
This was buggin me ever since I upgraded to Windows 10. FINALLY I CAN SEE MY WIFI SPEEDS AGAIN! Thank you, thank you, thank you!
Dear Ben,
Thank you for your nice comment. I am very glad this helped you see your WiFi speeds again in Windows 10 🙂
Have a GREAT week!
Best regards,
-J.D.
Cats ass. Good job.
Thank you, Richard. Much appreciated!
Have a rockin’ day!
-J.D.