How to Upgrade a Windows 10 VM to Windows 11 in VMware (Complete Guide)
TL;DR: Your old Windows 10 PC or VM (virtual machine) doesn’t meet Windows 11 requirements? It probably needs UEFI firmware, TPM 2.0, and Secure Boot, none of which older PCs and VMs were configured with out of the box. This guide walks through the full in-place conversion for VMware VMs without reinstalling Windows, in about 45 minutes. Many of the concepts (MBR to GPT conversion, UEFI firmware, clearing update policies) apply to physical PCs as well.
Microsoft ended Windows 10 support in October 2025, and software vendors are following suit. TurboTax Desktop 2025 dropped Windows 10 support entirely (it now requires Windows 11). Quicken still runs on Windows 10, for now. If you’re running critical financial or business software in a Windows 10 VM, the clock is ticking.
I recently upgraded a long-running Windows 10 Pro VM (which was originally from the Windows 7 era!) to Windows 11 Pro in VMware, without a clean install, preserving all applications and data. It took some research and a few careful steps, but the result was a fully supported Windows 11 VM with zero data loss.
Here’s exactly how I did it and feel free to comment if you have questions or suggestions!
The Problem: Your VM Fails Every Windows 11 Check 😜
Windows 11 requires UEFI firmware, Secure Boot, and TPM 2.0. Most older VMs have none of these. They were created with Legacy BIOS firmware, MBR disk partitioning, and no virtual TPM. Windows Update won’t even offer the upgrade until all three requirements are met.
My VM had all three problems, plus a fourth: the virtual hard disk was nearly full. Here’s what the starting point looked like:
- VMware hardware version: 6.5-7.x (ancient)
- Firmware: Legacy BIOS
- Disk partitioning: MBR
- TPM: None
- Disk space: 109 GB used of 120 GB
- Guest OS: Windows 10 Pro (VM template still said Windows 7)
Every single Windows 11 prerequisite was unmet. But because this is a VM, every single one is fixable.
Step 0: VMware Workstation Pro Is Now Free 💪
If you’re running VMware Player, stop. You need Workstation Pro for virtual TPM support, snapshots, and VM encryption. The good news: Broadcom made VMware Workstation Pro completely free for all users (personal, commercial, and educational) in November 2024. No license key required. Download the latest version (25H2u1 as of early 2026, or 17.6.x if you prefer the older naming) from Broadcom’s support portal and install it over your existing Player installation. Your existing VMs carry over automatically.
If your host has Hyper-V or Device Credential Guard enabled, the installer will offer to install Windows Hypervisor Platform (WHP) for coexistence. Accept it. The performance overhead is negligible for desktop VM workloads, and the alternative (disabling Hyper-V) would break WSL2, Docker, Windows Sandbox, and other features you may depend on.
Step 1: Back Up Everything
Before touching anything, back up your VM files. Copy the entire VM folder to a NAS, external drive, or another location. Snapshots are useful for quick rollback, but a full file-level backup gives you the ultimate safety net.
I keep my VM backups on a Synology NAS — which is overkill for most people, but something like the Synology DS224+ is a solid entry-level option. Backing up to a NAS gives you automated backups and versioned copies you can restore from if anything goes wrong. If you don’t have a NAS, a fast portable SSD like the Samsung T7 Shield works well for quick VM folder copies over USB-C. The key is having your backup on a completely separate device from the host machine running the VM.
One more thing: if you’re running VMs on a desktop, make sure you have a UPS (uninterruptible power supply) protecting that machine. A power loss during a firmware switch or partition conversion can corrupt the VM. Something like the APC Back-UPS 900VA is cheap insurance for the kind of work we’re about to do.
Step 2: Upgrade VM Hardware Version
Older VMs run on ancient virtual hardware. My VM was on hardware version 6.5-7.x, while modern VMware Workstation supports up to version 21.
With the VM powered off: VM → Manage → Change Hardware Compatibility → Workstation 17.x (hardware version 20). Select “Alter this virtual machine” rather than cloning, since you already have backups. This upgrades the virtual hardware to modern specs that support UEFI, vTPM, and current device drivers.
Also update the Guest OS type while you’re here: VM Settings → Options → General, then change it from “Windows 7 x64” to “Windows 10 x64” (or Windows 11 x64). This matters because VMware uses the guest OS type to determine which virtual hardware options to expose. For example, Secure Boot won’t be available if the guest OS is still set to Windows 7.
Step 3: Convert MBR to GPT (Inside the VM)
UEFI firmware requires a GPT partition table. Your old VM almost certainly uses MBR. The conversion must happen before switching the firmware, otherwise the VM won’t boot.
Note for physical PC users: This same mbr2gpt tool works on bare metal hardware. If you’re converting a physical machine from Legacy BIOS to UEFI, the process is identical. You’ll just change the firmware setting in your actual BIOS/UEFI setup instead of VMware settings.
Boot the VM into Windows 10. Open an elevated Command Prompt (right-click Start → “Command Prompt (Admin)”) and run:
mbr2gpt /validate /disk:0 /allowFullOS
If validation passes (“Validation completed successfully”):
mbr2gpt /convert /disk:0 /allowFullOS
This converts the partition table non-destructively in a few seconds. No data loss, no reinstall. You may see a warning about WinRE (“Failed to update ReAgent.xml”), that’s cosmetic and won’t affect booting.
Important: After conversion completes, shut down the VM completely. Do not reboot. We need to change the firmware setting before the next boot.
Step 4: Switch Firmware to UEFI
With the VM powered off: VM Settings → Options → Advanced → Firmware type, then change from BIOS to UEFI. Don’t enable Secure Boot yet, because it requires encryption first (see the next step).
Step 5: Encrypt the VM and Add TPM
Virtual TPM requires VM encryption. With the VM still off:
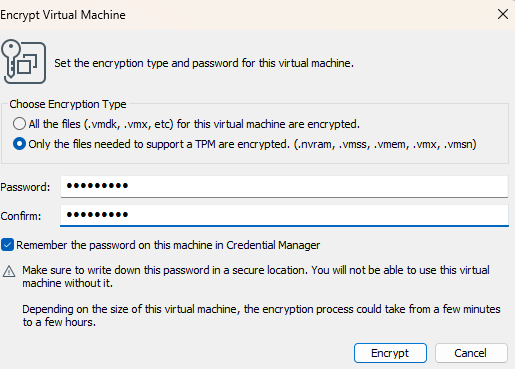
- VM Settings → Options → Access Control → Encrypt
- Choose “Only the files needed to support a TPM” (.nvram, .vmss, .vmem, .vmx, .vmsn files only). This is faster, creates less overhead, and is sufficient for our purposes. No need to encrypt the entire virtual disk.
- Set and record a password. Store it somewhere safe, because you’ll need it if you ever move this VM to another host machine.
- After encryption completes, go back to Options → Advanced and check “Enable secure boot” (it should no longer be grayed out).
- Hardware tab → Add → Trusted Platform Module
Gotcha: Snapshots block encryption. If you took a snapshot earlier, VMware will refuse to encrypt until you delete it. Your file-level backups are your safety net here, so delete the snapshot and proceed.
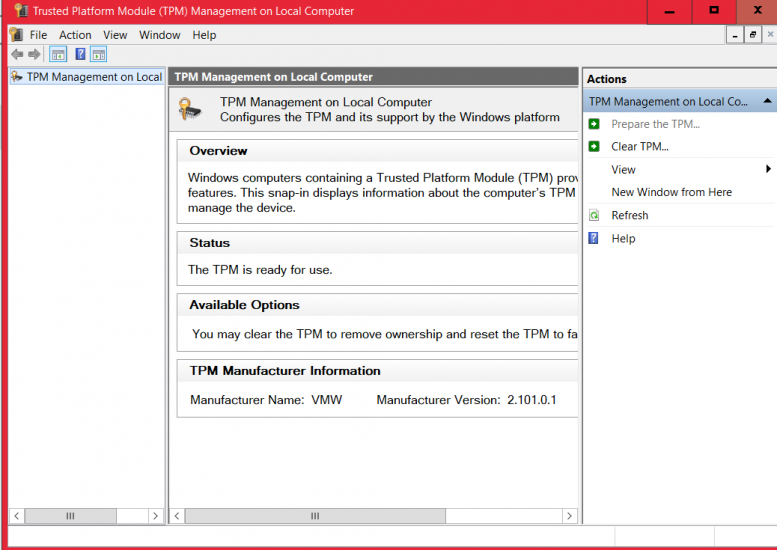
When all is said and done, you’ll have this working in your VM:
Step 6: Expand the Virtual Disk
The Windows 11 upgrade needs approximately 30-40 GB of free space for temporary files and the Windows.old rollback folder. If your disk is tight (mine had only 11 GB free), expand it now.
With the VM powered off: VM Settings → Hardware → Hard Disk → Expand. I went from 120 GB to 240 GB. VMware virtual disks are thin-provisioned by default, so the expanded disk only consumes actual host disk space as the guest writes to it.
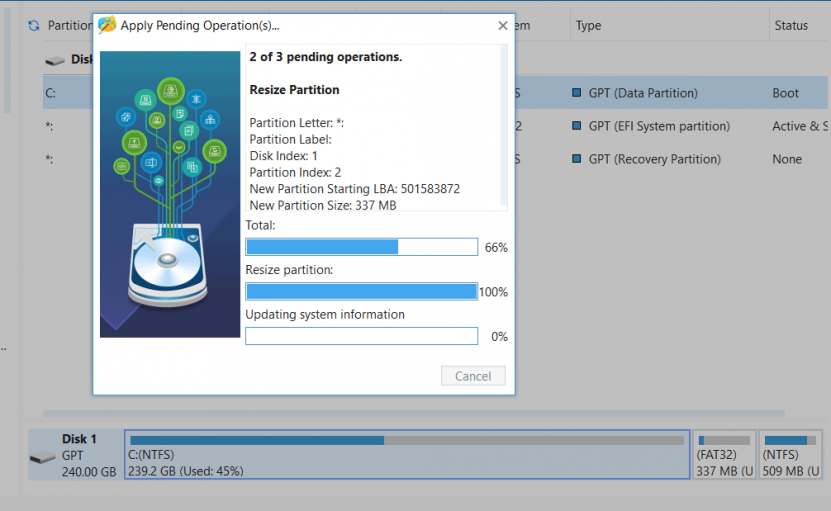
After expanding, boot the VM. You’ll likely find the new unallocated space is separated from C: by the EFI System Partition and Recovery Partition. Windows Disk Management can’t extend C: past these intervening partitions.
![]()
Use MiniTool Partition Wizard Free (version 13.6 or newer, available at minitool.com) to move the EFI and Recovery partitions to the end of the disk, then extend C: into the freed space. Queue all operations and apply. It handles the reboot and partition moves automatically. Watch the installer for bundled extras and uncheck anything that isn’t Partition Wizard itself.
Step 7: The Moment of Truth, Boot and Verify
Power on the VM. If the MBR-to-GPT conversion and firmware switch worked correctly, Windows 10 should boot normally under UEFI.
Verify TPM is working: press Win+R, type tpm.msc, and hit Enter. You should see “The TPM is ready for use” with Specification Version 2.0 and Manufacturer Name VMW.
If the VM fails to boot, don’t panic. Just power off, go back to VM Settings → Options → Advanced, flip the firmware back to BIOS, and troubleshoot the MBR2GPT conversion. Your backups are there if you need to start over.
Step 8: Clear Update Policies and Upgrade
If you previously set Group Policy or registry keys to pin your Windows version (a common trick to prevent unwanted feature updates and restarts), those will block the Windows 11 upgrade. Check with:
reg query "HKLM\SOFTWARE\Policies\Microsoft\Windows\WindowsUpdate" /s
If you see TargetReleaseVersion, ProductVersion, or TargetReleaseVersionInfo entries pinning you to a specific Windows 10 version, remove them:
reg delete "HKLM\SOFTWARE\Policies\Microsoft\Windows\WindowsUpdate" /v TargetReleaseVersion /f
reg delete "HKLM\SOFTWARE\Policies\Microsoft\Windows\WindowsUpdate" /v ProductVersion /f
reg delete "HKLM\SOFTWARE\Policies\Microsoft\Windows\WindowsUpdate" /v TargetReleaseVersionInfo /f
Restart the Windows Update service to pick up the changes:
net stop wuauserv
net start wuauserv
Now go to Settings → Update & Security → Windows Update. Install all pending Windows 10 updates first (there may be several rounds of updates and reboots).
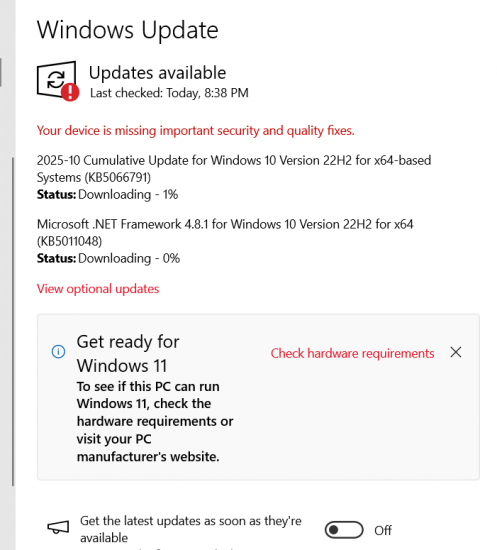
Once fully current, the Windows 11 upgrade should appear as an available option. Back up your VM to your NAS one more time as a pre-upgrade checkpoint, then let the Windows 11 upgrade do its thing.
The Complete Checklist
Here’s the full sequence in order. Don’t skip steps or rearrange, because several steps have dependencies on previous ones.
- ☐ Install VMware Workstation Pro (free, version 17.6.x or 25H2u1+). This replaces VMware Player and adds support for vTPM, snapshots, and VM encryption.
- ☐ Back up your entire VM folder to a NAS, external drive, or other safe location. File-level backups are your ultimate rollback path.
- ☐ Upgrade VM hardware version to Workstation 17.x (hardware version 20). This enables modern virtual hardware including UEFI and vTPM support.
- ☐ Change guest OS type from Windows 7 (or whatever it’s set to) to Windows 10 x64 or Windows 11 x64. This unlocks Secure Boot and other OS-specific options in VMware.
- ☐ Boot the VM and convert MBR to GPT using Windows 10’s built-in
mbr2gpt /convert /disk:0 /allowFullOScommand. Then shut down completely (do not reboot). - ☐ Switch firmware from BIOS to UEFI in VM Settings → Options → Advanced. Leave Secure Boot unchecked for now.
- ☐ Delete any existing snapshots (required before encryption). Your file-level backups protect you.
- ☐ Encrypt the VM using “Only the files needed to support a TPM” option. Record the encryption password in a safe place.
- ☐ Enable Secure Boot in VM Settings → Options → Advanced (no longer grayed out after encryption).
- ☐ Add Trusted Platform Module via Hardware tab → Add → Trusted Platform Module.
- ☐ Expand virtual disk if needed. The Windows 11 upgrade requires 30-40 GB of free space on C:. I expanded from 120 GB to 240 GB.
- ☐ Boot and extend C: partition using MiniTool Partition Wizard Free (v13.6+, minitool.com). Move EFI and Recovery partitions to the end of the disk, then extend C: into the freed space.
- ☐ Verify TPM by running
tpm.mscinside the VM. Confirm version 2.0 and “ready for use” status. - ☐ Remove any Windows Update version-pinning policies (check
HKLM\SOFTWARE\Policies\Microsoft\Windows\WindowsUpdatefor TargetReleaseVersion entries). - ☐ Install all pending Windows 10 updates until fully current. May require multiple rounds of updates and reboots.
- ☐ Back up the VM again as a pre-upgrade checkpoint. This is your last known-good state before Windows 11.
- ☐ Upgrade to Windows 11 via Settings → Update & Security → Windows Update.
Things I Learned the Hard Way
Snapshots block encryption. VMware won’t let you encrypt a VM that has snapshots. Delete them first. Your file-level backups are your safety net.
Secure Boot is grayed out until three conditions are met. The VM must be encrypted, snapshots must be deleted, and the guest OS type must be set to Windows 10 or 11. It’s a chain of dependencies that isn’t documented in one place.
The EFI partition moves safely. UEFI finds the EFI System Partition by its GPT type GUID, not its physical position on the disk. Moving it to the end of the disk to make room for C: expansion is perfectly safe.
MBR2GPT’s WinRE warning is harmless. You may see “Failed to update ReAgent.xml” after conversion. This doesn’t affect booting or the Windows 11 upgrade. The Recovery partition and WinRE can be repaired later if needed.
Windows Update policies are sticky. If you set TargetReleaseVersion via Group Policy or registry to prevent feature updates (a common practice for production VMs), you must remove those entries before Windows 11 will be offered as an upgrade. The “Some settings are managed by your organization” banner in Windows Update settings is your clue that policies are active.
Windows activation survives the conversion. Changing CPU count, RAM, and firmware type in a VMware VM does not trigger Windows reactivation. VMware ties activation to the VM’s SMBIOS UUID, which persists through all of these changes.
Was It Worth It vs. a Clean Install?
For my use case, absolutely. This VM had years of Quicken financial data, TurboTax prior-year files, application configurations, and saved credentials. A clean install would have meant reinstalling everything and migrating data manually.
The in-place conversion preserved every file, every application, and every setting. Total hands-on time was about 45 minutes, with most of that spent waiting for updates to download.
If you’re starting from scratch or your VM is expendable, a fresh Windows 11 install is simpler. But if your VM has accumulated state that matters, the conversion path is well worth the effort.
Running into issues with your VM upgrade? Have a different VMware configuration or upgrade method? Drop a comment below. I’ve probably hit the same wall and can help you through it.
Search Terms People Used to Find This Page:
- upgrade windows 10 vm to windows 11
- vmware add tpm 2.0 to virtual machine
- vmware windows 11 requirements vm
- convert legacy bios to uefi vmware
- mbr2gpt vmware virtual machine
- vmware workstation windows 11 tpm
- vmware player vs workstation pro tpm
- windows 11 upgrade not showing vmware
- turbotax requires windows 11
- vmware secure boot grayed out
- encrypt vm for tpm vmware