How to Find Your New Synology NAS IP Address (DS925+ and Others)
TL;DR: Synology NAS devices use DHCP, so there’s no default IP address. To find your new DiskStation on the network, open find.synology.com in any browser. It will detect the NAS and hopefully show you the IP address in seconds.
The Problem
You unbox a new Synology DS925+, slot in your drives, plug in Ethernet and power, and wait for it to boot. Now what? Unlike a router with a sticker on the bottom showing 192.168.1.1, Synology NAS devices don’t have a fixed default IP. They pull whatever address your DHCP server hands out.
If you don’t know the IP, you can’t get to the DSM setup wizard. And if you’re running a larger subnet or have dozens of devices on the network, scrolling through your router’s client list is tedious.
The Fix: find.synology.com
Synology built a free web-based discovery tool that does exactly one thing: finds your NAS on the local network. Open any browser and go to find.synology.com. Within a few seconds, it will detect any Synology DiskStation on your subnet and display the server name, IP address, MAC address, model, and setup status. (TIP: you will likely have to approve a browser permission that will pop up!)
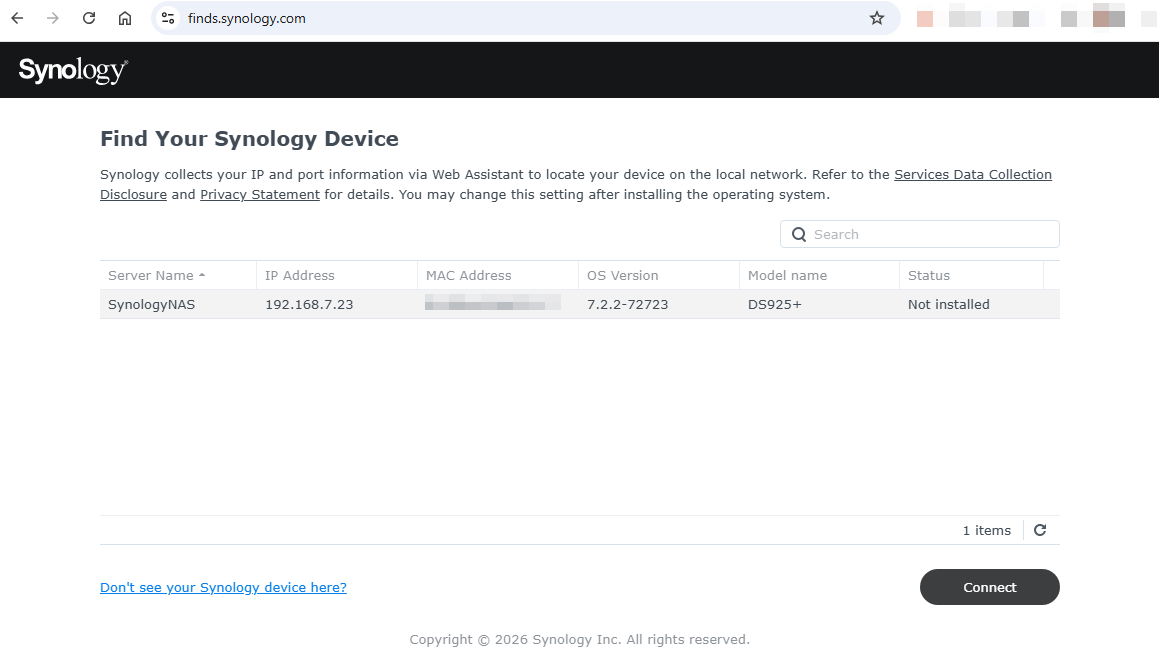
In my case, the DS925+ showed up as “SynologyNAS” at 192.168.7.23 with a status of “Not installed,” meaning it was ready for the initial DSM setup. One click on Connect and you’re in.
Alternative Methods
If find.synology.com doesn’t work for you (some corporate networks block the broadcast traffic it uses), you have a few other options:
- Check your router’s DHCP lease table. Log into your router and look for a new client named “DiskStation” or “SynologyNAS.”
- Use Synology Assistant. It’s a free desktop app from Synology’s download center that does the same network scan as the web tool.
- Ping sweep your subnet. On Linux or macOS, you can ping the entire range and then check your ARP table. Synology devices typically use the MAC prefix
00:11:32, though newer models like the DS925+ may use different prefixes.
What to Do Next
Once you have the IP, open http://[your-nas-ip]:5000 in a browser to start the DSM setup wizard. It will walk you through creating an admin account, formatting your drives, and configuring storage.
One tip: after DSM is set up, assign a static IP to the NAS in your router’s DHCP reservation settings. A NAS that changes IP addresses every time your router reboots will break mapped network drives, backup schedules, and any services you’re hosting. I’ve dealt with Synology access issues before and a stable IP eliminates an entire category of headaches.
If you’re setting up a DS925+ like I am, the four SATA bays accept standard 2.5″ or 3.5″ drives. I went with four Samsung 870 EVO 4TB SSDs for silent operation, low power draw, and solid reliability (they are one of the best values out there right now IMHO). If you’ve installed drives in a Synology before, the process hasn’t changed much since the DS1813+ days.
Bottom Line
Finding a new Synology NAS on your network is a 10-second task once you know the trick. Bookmark find.synology.com and you’ll never have to guess the IP again. It works for any Synology model, not just the DS925+.
Setting Up a Synology NAS?
Here’s what I’m running in mine:
- Synology DS925+ – 4-bay NAS with dual 2.5GbE, AMD Ryzen, expandable to 9 bays
- Samsung 870 EVO 4TB SSD (x4) – Dead silent, low heat, 5-year warranty
The 870 EVO is the most popular SATA SSD for a reason. Four of them in a DS925+ gives you 16TB of fast, quiet, reliable NAS storage.
Some links in this post are affiliate links. If you buy something through one of these links, I may earn a small commission at no extra cost to you. I only recommend products I’ve personally used or thoroughly researched.
Accurate at time of writing. Something off? Drop a comment.