Getting Z-Image-Turbo Working in RuinedFooocus (AI)
Getting Z-Image-Turbo Working in RuinedFooocus (The Settings That Actually Matter)
If you’ve been following AI image generation tech, you’ve probably heard about Z-Image-Turbo: a 6 billion parameter model from Alibaba’s Tongyi MAI team that’s been making waves. It generates photorealistic images with impressive prompt adherence, runs on consumer GPUs with ~10-16GB VRAM, and does it all in just 8 steps. Pretty wild stuff! 🔥
I’ve been testing it in RuinedFooocus and wanted to share some tips because, spoiler alert, the default settings will give you absolute garbage. Ask me how I know. 😅
The Problem: Blurry Abstractness
So I downloaded the FP8 all-in-one model (z-image-turbo-fp8-aio.safetensors), dropped it in my checkpoints folder, selected it, typed “butterfly” and hit generate. What I got looked like someone smeared vaseline on a kaleidoscope. Not exactly the photorealistic quality I was promised!
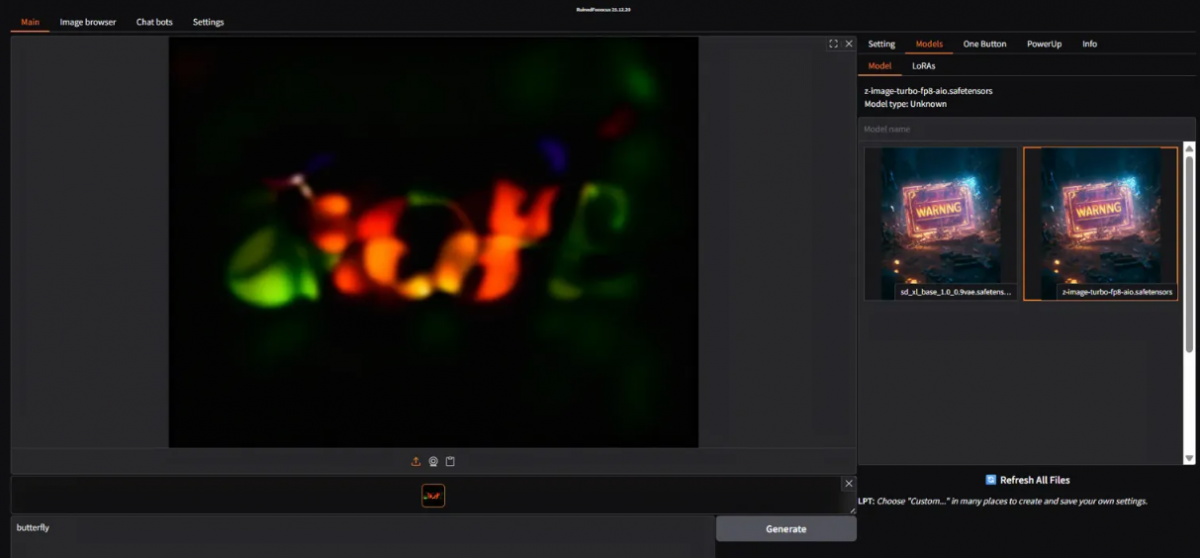
The issue? RuinedFooocus was using my SDXL settings: CFG 8, 30 steps, DPM++ 2M SDE sampler with Karras scheduler. These settings are completely wrong for Z-Image-Turbo.
The Fix: Turbo-Specific Settings
Z-Image-Turbo is a distilled model, meaning it was trained to generate good images in very few steps with minimal guidance. Using high CFG and lots of steps essentially “overcooks” the image into that blurry mess.
Here’s what you need to change:
| Setting | Wrong (SDXL defaults) | Correct (Z-Image-Turbo) |
|---|---|---|
| CFG | 7-8 | 1 (or even 0) |
| Steps | 20-30 | 8-9 |
| Sampler | dpmpp_2m_sde_gpu | euler |
| Scheduler | karras | simple or beta |
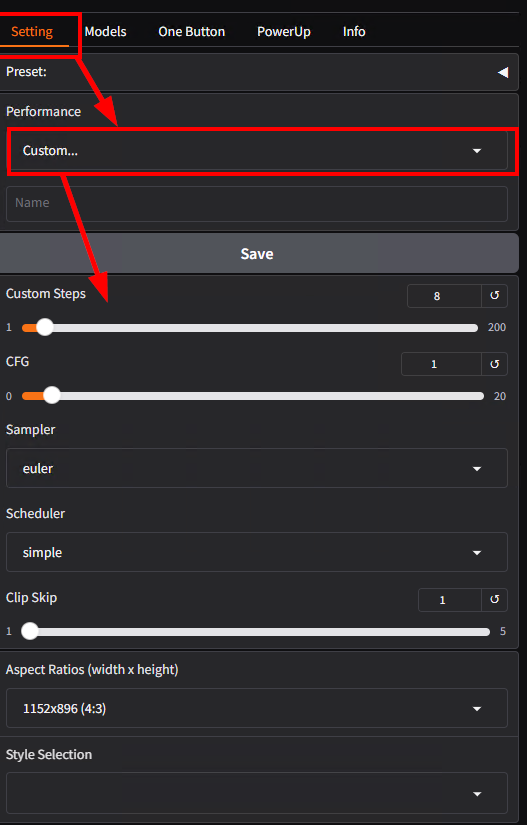
***In RuinedFooocus, go to the Setting tab and look for a “Custom” performance option to unlock manual control over these values.***
Note: With CFG at 1.0 or below, negative prompts basically do nothing—so don’t waste your time writing elaborate negative prompts. Just leave it empty.
The Results: Night and Day Difference
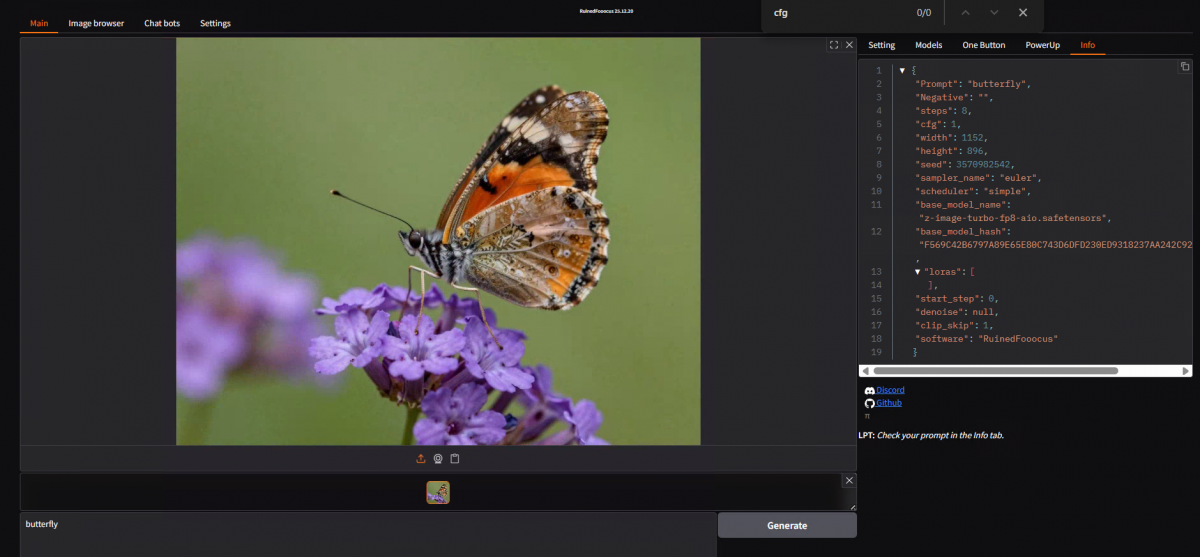
After changing the settings, the same one-word “butterfly” prompt went from abstract blur-art to a stunning macro photograph of a painted lady butterfly on lavender. The difference is honestly jaw-dropping.
Tips for Even Better Quality
A few things I’ve learned while experimenting:
- Try the “beta” scheduler – Often produces slightly cleaner results than “simple”
- Bump steps to 9-10 – If you’re seeing slight graininess, one or two extra steps can smooth things out without overcooking
- Write detailed prompts – Z-Image-Turbo has excellent prompt adherence, so be specific! Instead of “butterfly”, try something like: “A painted lady butterfly perched on purple lavender flowers, macro photography, sharp focus, natural lighting, highly detailed wing patterns”
- Consider the BF16 model – If you have the VRAM (~16-20GB), the BF16 version produces cleaner images than the FP8 quantized version I’m using
Installation Quick Reference
If you haven’t installed Z-Image-Turbo yet, here’s the quick version:
Option 1: All-in-One (Easiest)
- Download
z-image-turbo-fp8-aio.safetensors(for ~10GB VRAM) orz-image-turbo-bf16-aio.safetensors(for ~20GB VRAM) - Place in:
RuinedFooocus\models\checkpoints\ - Done!
Option 2: Separate Files (I haven’t tried this yet)
- Diffusion model →
repositories\ComfyUI\models\diffusion_models\ - Text encoder (qwen_3_4b.safetensors) →
repositories\ComfyUI\models\text_encoders\ - VAE (ae.safetensors, same as Flux) →
repositories\ComfyUI\models\vae\
You can find the models on HuggingFace (Comfy-Org/z_image_turbo) or CivitAI.
One Quirk to Know About
Z-Image-Turbo has a known issue where it produces very similar images across different seeds—especially faces. If you need more variety, try slightly varying your prompt between generations or using a two-pass workflow (generate at low resolution, then img2img with ~0.7 denoise).
Bottom Line
Z-Image-Turbo is genuinely impressive once you dial in the right settings. Sub-second generation times, photorealistic output, and it runs on consumer hardware. Just remember: CFG 1, Steps 8-9, Euler sampler, Simple/Beta scheduler. Ignore this and you’ll be staring at blurry messes wondering what all the hype was about lol. 😉
Happy generating!
–J.D.
Top Search Terms: z-image-turbo ruinedfooocus settings, z-image-turbo blurry fix, z-image-turbo cfg steps, ruinedfooocus z-image setup, z-image-turbo fooocus install